


...
How to Hold a Guitar: Beginner’s Guide

Developing proper posture is the first step in the thrilling journey of learning to play the guitar. We’ll take you through the fundamentals of holding a guitar properly in this article, so that your musical journey has a strong base.
Importance of proper Guitar Holding:
More than just a matter of style, holding your guitar properly is essential for comfort, skill, and overall enjoyment of the instrument. Proper guitar holding helps in the following:
- Injury Prevention: Learning to play the guitar should not cause discomfort by using proper technique, which lowers the chance of strains and other injuries.
- Sound Quality: A clear, crisp sound is essential to the overall quality of your music, and it may be produced with good posture.
- Development of Skills: Good posture lays the groundwork for later mastery of more complex methods.
Basic Guitar Anatomy:
Knowledge of the basic anatomy of your guitar is essential to holding it correctly.
- Body: Main portion of the guitar, where the strings and sound hole are located.
- Neck: Long, narrow section that joins the body and headstock.
- Tuning pegs: Located on the headstock, which is the uppermost part of the neck.
- Strings: To make music, you usually need to pluck or strum six strings.
- Fingerboard: Divided into portions by metal strips called frets that run along the neck.
Proper Guitar Holding Techniques
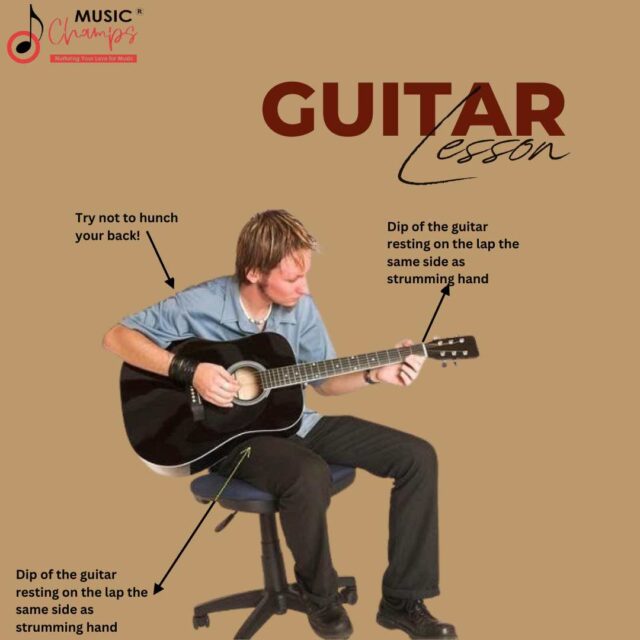
Step 1: Take a Seat in the Comfortable Chair
Practice your guitar playing while seated when you are first learning. Use a guitar stool or an acceptable chair without armrests. Straighten your back while sitting, and place your feet flat, crossed, or on a footrest.
Step 2: Properly Orient the Guitar
The thinnest string should be oriented towards the floor, and the lowest, thickest E string, should be closest to the ceiling. As you hold the guitar, turn its body to face your dominant hand, which is the one you use to write. The guitar neck needs to be on the side that is not your dominant hand.
Step 3: Balance the Base on Your Thigh
Form a right angle with your knee by bringing your dominant side leg slightly forward. Maintain a straight back. Place the base or tail of the guitar on your dominant side thigh to maintain balance.
Step 4: Raise the Neck Angle
Hold the neck 45 degrees from the floor, not straight up. This is the most convenient and advised method of getting started with learning.
Step 5: Secure the body using your dominant elbow and forearm
When you strumming, make sure the guitar is snug against your body with your elbow and forearm. Maintain your wrist resting on the guitar’s bridge. The sound produced depends on where you lay your hand in respect to the sound-hole.
Step 6: Hold the neck in place with your thumb and forefinger.
Form a “V” shape with your fretting hand’s thumb and forefinger to support the guitar. Avoid supporting the guitar with your fretting hand.
Step 7: Maintain a Straight Back
Proper technique requires maintaining a straight back and holding the guitar perpendicular to the ground.


